Thursday, October 31, 2013

Renovation Plans for the Kitchen

Follow my blog with Bloglovin
We have known since day one that the kitchen would need total renovation, so in the midst of our other endeavors we have been cooking up some pretty awesome plans for the kitchen overhaul. 
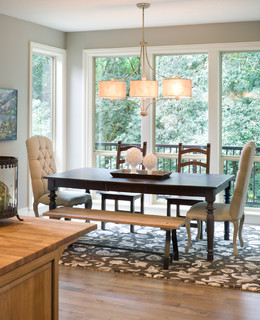
If you remember, this is what our kitchen looks like now.


But we have since made some big plans for the space and are looking forward to its new look! +Lowe's Home Improvement has been SO HELPFUL in getting our plans together. I brought the measurements and my ideas to Melissa, an awesome kitchen designer, and we have been on a roll with the planning ever since.  

A few things we absolutely wanted: Solid Wood Cabinetry, Granite Counters, New Appliances, Traditional style, and a more open concept. Here is the NEW and IMPROVED layout for our space.

OLD LAYOUT:


NEW LAYOUT:

Notice the pantry on the far left - so excited to have this space!
The cabinets to the right and left of the window have glass doors to make the area feel more open.


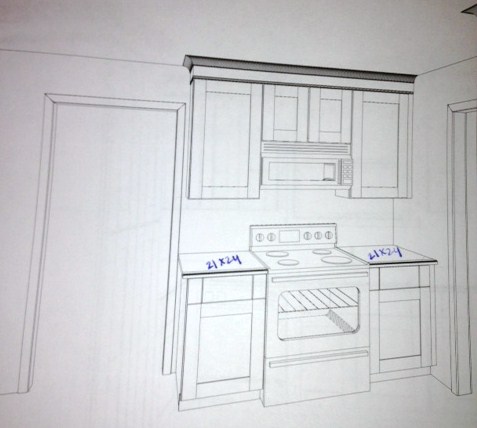
We chose White Shaker-style cabinets made by Shenandoah Cabinetry. They are solid wood and gorgeous like these! The other part is choosing granite, sink, faucet, flooring, cabinet hardware, and a mobile kitchen island! More on those selections later. 

So its official,  the plans are submitted and are cabinets are in the process of being made just for us!

HAPPY HALLOWEEN!


Can't wait for the kitchen reveal?

Monday, October 28, 2013

Turning a Thrift Store Mirror into a Gorgeous Floor Mirror

We purchased a floor mirror for $10 about a year ago. We did not know where we were going to put it when we purchased it, but we knew it was too good of a deal to pass up! 
A year later I have found the perfect spot for it, so it is time to get this mirror rehabbed.


I tried to sand the mirror first to provide a rougher surface for the paint to stick to, but it is made of laminate and I could not rough-it-up even with a palm sander. So I ripped off the laminate and then sanded again!  I also decided to prime it with Porter Paints Primer & Sealer in hopes of the paint sticking! 


After Priming. 

I chose Rustoluem Satin Nickel spray paint to finish the job. I sprayed with two coats of paint, and allowed the mirror to dry in the sun for a few hours before picking it up.


The Finished Product: A Dressing Area in our Master. 
Complete with a gorgeous silvery floor mirror and slat back chair. 
Perfect for getting ready in the mornings.


Monday, October 21, 2013

Update: Installing the Door to the Garage & Learning to Mortise

UPDATE: 
The NEW door hardware has been installed. It is a beautiful oil rubbed bronze bolt and lock set.

The Install

Looking fabulous.

MORE IMPORTANTLY...
Ty's parents saw our last post on "mortising" and bought us an ACTUAL chisel set! Hooray:)


Next up: tackling the door frame so it fits our new bolt and lock!
We will definitely be using our new chisel set for this project.

Mortising a Hinge. I know, I know. It begs the question, you want to WHAT a WHAT?!? But, let me tell you the Dilbecks now know how to MORTISE. 
In case you are STILL wondering what the heck I am talking about...

mor·tise also mor·tice  (môrts)
n.
1. A usually rectangular cavity in a piece of wood, stone, or other material, prepared to receive a tenon and thus form a joint.
2. Printing A hole cut in a plate for insertion of type.
tr.v. mor·tised also mor·ticedmor·tis·ing also mor·tic·ingmor·tis·es also mor·tic·es
1. To join or fasten securely, as with a mortise and tenon.
2. To make a mortise in.
3. Printing
a. To cut a hole in (a plate) for the insertion of type.
b. To cut such a hole and insert (type).


Here we are, MORTISING the night away! (or at least Ty is)

The REAL story is that the door between the garage and the kitchen area is old and not up to code. It falls into the category of things (like the loft) we needed to do immediately upon moving into the house. So when we were wandering through Lowe's and saw a STEEL DOOR in the clearance section, we knew we had to go for it. 

So, onto all the Mortising...

Step One... 
Buy a door that already has mortised hinges! We did not realize when we bought this door that it would not fit into the door frame without the hinges being recessed into the side of the door. Learning curve #1. 


Step #2:
Since we had already hung the door on the existing hinges 
(only to discover they needed mortising.... I digress)... 
we were easily able to pencil above and below the hinges on the new door to mark the area for chiseling. 


STEP 3.
 Remove the door with your measurements and hinge markings. 


STEP 4. 
We used a small skill saw to make VERY shallow indention on the hinge markings. These served as our starting point for the chiseling. (There is an actual special tool for mortising, but again WHO KNEW we would need it). 


STEP FIVE.
Start chiseling. We went too deep in some areas and not deep enough in others (learning curve #2). Again, without the proper tools it is very hard to get a precise fit BUT the end result for us is that the hinges are flush with the side of the door.


STEP 6. Mount Door on your NEWLY mortised hinges, 
and admire how flush they are with the side of your new door!


Old door


LOOK! LOOK! NEW DOOR, NEW DOOR! 

And THAT, is how you mortise, People!


Friday, October 18, 2013

Repairing & Painting the Front Porch Arbor


While Ty's dad repaired the front door, Ty repaired the awning over the porch. The awning gets full sun for half the day, so over time the paint has chipped away and cracked in many areas. 


1. Sand awning with palm sander.


2. Paint with Sherwin Williams SuperPaint Exterior Paint in Dover White (satin finish). 


3. Stand back and admire the beautiful handiwork. (and finish painting the brick!)


Happy Friday y'all! 

Monday, October 14, 2013

Repairing & Painting the Front Door


Here is our front porch. It is shabby, but not so chic. You are getting a little exterior painting preview here, too! While Ty's parents were in town we tackled the front porch. Here is HOW we refinished the front door. 


1. We removed the front door to prepare for sanding.
2. Ty's dad went to work with the electric sander. 


3. After sanding through dark green, red, cream, and white paint -
He used Bondo All Purpose Putty to seal the crack in the door frame 
(you could literally see the sun setting through the door in the evenings).


4. Once the bondo dried, he sanded the door again. 


5. Time to Prime & Paint! I used Porter Paints Primer & Sealer for the first layer, then I used 
Benjamin Moore Stratton Blue tinted in Sherwin Williams Super Pain in Satin. 


Three coats later...

6. Re-install the original door hardware


Monday, October 7, 2013

A High End Look for Our Dining Room on a Budget


I LOVE this transitional dining room. It is elegant and fresh without being pretentious. It is inviting and comfortable while maintaining a luxurious feel. This is the look I wanted to create for our dining room. 
Here is HOW we created the LOOK FOR LESS!

Dilbeck Dining Room
Let's start with the table, bench, and slat-back chairs. We found this farmhouse style table on Craigslist for $380. The seller also included two additional slat back chairs (to be used in another area of the house) and two cushioned end chairs (seen below). We sold the end chairs for $100, bringing our total cost for the table, bench, and slat-back chairs to $280. Similar tables sell for upwards of $1500 like this one at Williams-Sonoma.


The end chairs pictured in our Designer Dining Room are custom tufted end chairs from the Interior Design company listed. I found some similar chairs at a high-end retailer in Nashville...


Even on sale, these chairs are $525 each! Blowing my budget right out of the water. So, we opted for our trusty Craigslist to bring us a deal. We found the white parsons chairs for $40 for the pair. Since we are not using a rug in our space like in the Designer Dining Room, we are going to add some texture and pattern by making Ikat fabric slipcovers for the parson's chairs like these from Ballards...

The total cost for the Ballard slipcovers is $474 (includes 15% promo code) so my plan is to purchase a similar  fabric for around $20/yard and sew these with the help of my mom. Each parson's chair needs 4-5 yards of fabric plus cording and additional sewing supplies for a total of around $250 for the slipcovers.


The BEST FIND by far in this look for less journey is the light fixture. Yes, this is the exact light fixture pictured in the Designer Dining Room. You can find it here, too. It retails for $559.90. While looking for similar fixtures online, I found this exact fixture in an amazon warehouse for $142.78 (free shipping and no tax!!!) Meant.to.be.


Last but not least: ACCESSORIZING! I love the decorative porcelain succulents in the Designer Dining Room. I found these similar accents at Target on clearance. $12.94 each plus the silver tray (also on clearance for $15) brought the accessorizing total to around $40. I was able to find the exact Porcelain artichokes used in the Designer Dining Room on amazon.com for $204. I found similar trays for around $50, but they can range up to $150.

So, what does the total look for less, look like?

     Item
Designer Dining Room             Dilbeck Dining Room
Farmhouse Table                                          $1,600 $280
Light Fixture $559.90 $142.78
Accessories $254 $40
Upholstered End Chairs $1,050 $290
Bench  $250              (included in Table price)
Slat-Back Chairs $400              (included in Table price)
GRAND TOTAL = $4,114 $753

THE LOOK FOR LESS, (much less)


DINING ROOM: 80% Complete

Related Posts Plugin for WordPress, Blogger...

Blog Archive