

With the chair debacle of 2014 resolved, I wanted to focus on decorating the mantle to finish up the living room. I looked for art at antique malls, garage sales, and even did some online shopping but I still could not find what I wanted for the living room. I really liked this piece from Ballard Designs. It is colorful and abstract... but too large for our space.
I wanted to create something similar but I was nervous about doing something abstract on such a large scale. In the past, I did some abstract art for our kitchen, but it was more of a whimsy and fun look rather than the more formal look I wanted for the living room.

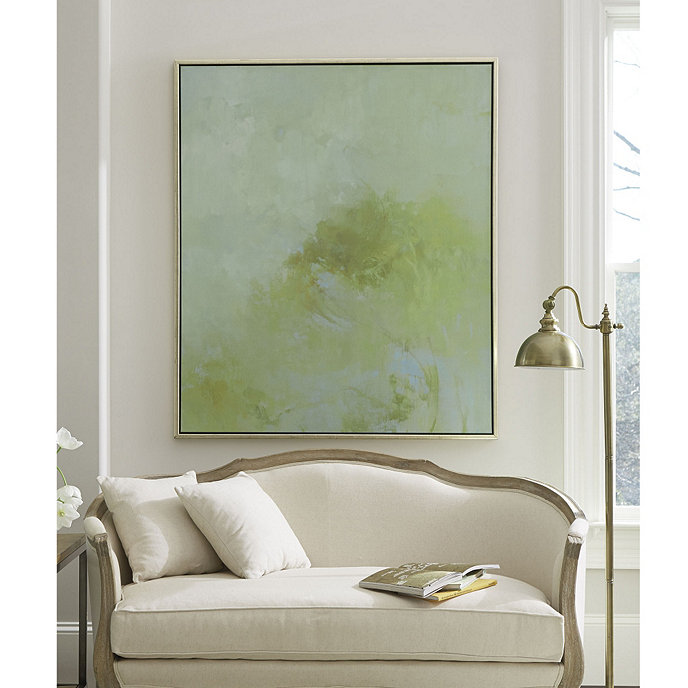
I have also seen some amazing marble wrapping papers lately and thought using one of those sheets as art would be fun. I went to a fancy paper supplier here in Nashville and while I was looking at the marble papers, I stumbled upon this Ombre Paper that was a perfect fit for our living room.

Originally I thought that I was going to do to frames side by side on the mantle, so I bought two. It is $6 a sheet - for art this is a cheap risk to take, for wrapping paper it about kills me to purchase it (I digress). I had two frames from botanical prints I was using in the dining room (more on that change up later). I decided to use those frames ($25 each on clearance at TJMaxx) for my art to make an easy DIY Custom Framed Art for only $30.

First, I took the brown kraft paper backing off of the frame. It was super easy. I used an xacto knife to pierce a small shallow hole in the back, and then I ripped off the thin paper backing.


Next, I had to pry up each staple holding the matte board in place. I lost a lot of staples along the way, but did try to be gentle as I went so that I could use them again to secure the matting when I replaced it with the new artwork.

Once the staples were open, I could easily remove the matte board and artwork.

The matte board and artwork were glued together - surprise! I did not anticipate this, but using an xacto knife I was able to gently separate the matte board from the artwork. I did not worry about messing up the old art and focused on keeping the matte board intact.


Once separated, I placed the matte over my Ombre Paper. Fortunately, the paper was the exact size I needed. But if it had been too large, I would have used an xacto knife and metal ruler to cut it to the correct size for the matte.

The matte still had some sticky back lefts so it secured easily to the new artwork. I then placed the new matted art back in the frame, and secured the staples that were left. Voila! New art!! You could also opt to replace the paper back board but with my flare for change and decorating, I figure its only a matter of time before I want to try something new.


so cute, caroline!
ReplyDeleteThanks Carrie! Loved perusing your blog this morning. It is adorable!!
Delete